
Quick Overview: The Secrets to Perfect Halloween Cookies
Exceptional Halloween cookies require two foundational elements: a structurally stable, no-spread cookie base and precisely calibrated icing. Without proper dough formulation, detailed cookie cutters turn into indistinct baked blobs in the oven.
Mastering royal icing comes down to controlling hydration levels. You need thick piping icing to construct borders and fluid flood icing to create silky, porcelain-smooth canvases for your spooky artwork.
- Keep butter cool: Cream butter and sugar only until combined to avoid trapping excess air that causes cookies to puff and lose definition.
- Count your icing seconds: A 15-to-20-second flood consistency delivers flat surfaces without cratering or spilling over borders.
- Dry with moving air: Tabletop fans accelerate icing crusting, preventing color bleeding and retaining glossy finishes on dark designs.
Halloween baking brings an unmatched blend of culinary craft and creative artistry. Whether you are packaging favors for a classroom, prepping treats for an October party, or executing custom orders for a bakery, your cookies must look sharp and taste incredible.
This comprehensive guide covers everything from the structural food science of dough stabilization to advanced wet-on-wet royal icing techniques. You will gain the exact formulas, troubleshooting methods, and step-by-step instructions needed to bake showstopping Halloween cookies every time.

Foundational Science: Baking No-Spread Cut-Out Cookies
The biggest disappointment in seasonal baking is watching sharp ghost silhouettes or intricate bat wings melt into round blobs on the baking sheet. Cookie spread is caused by excessive leavening, high moisture, over-aeration, and warm dairy fats.
When fat melts in the oven before the flour’s gluten structure sets, the dough pools outward. Controlling your ingredients and mixing methods stops this process completely.
Flour Protein and Cornstarch Integration
Standard unbleached all-purpose flour provides the ideal protein content (around 10% to 11.5%) for cut-out cookies. It delivers enough gluten structure to maintain crisp edges without turning tough.
Replacing two tablespoons of flour per cup with cornstarch lowers the overall gluten elasticity while absorbing excess moisture. This creates a melt-in-the-mouth crumb that holds exact cookie-cutter impressions through the bake.
The Butter Aeration Trap
Most traditional drop cookie recipes instruct you to cream room-temperature butter and sugar for several minutes until light and fluffy. This step incorporates thousands of microscopic air pockets into the dough.
For Halloween cut-out cookies, excessive trapped air expands rapidly in the heat of the oven, causing cookie surfaces to buckle and edges to soften. Cream your butter and granulated sugar for no more than 90 seconds on medium-low speed. The mixture should look combined and pasty rather than pale and voluminous.
Temperature Control and Chilling Cycles
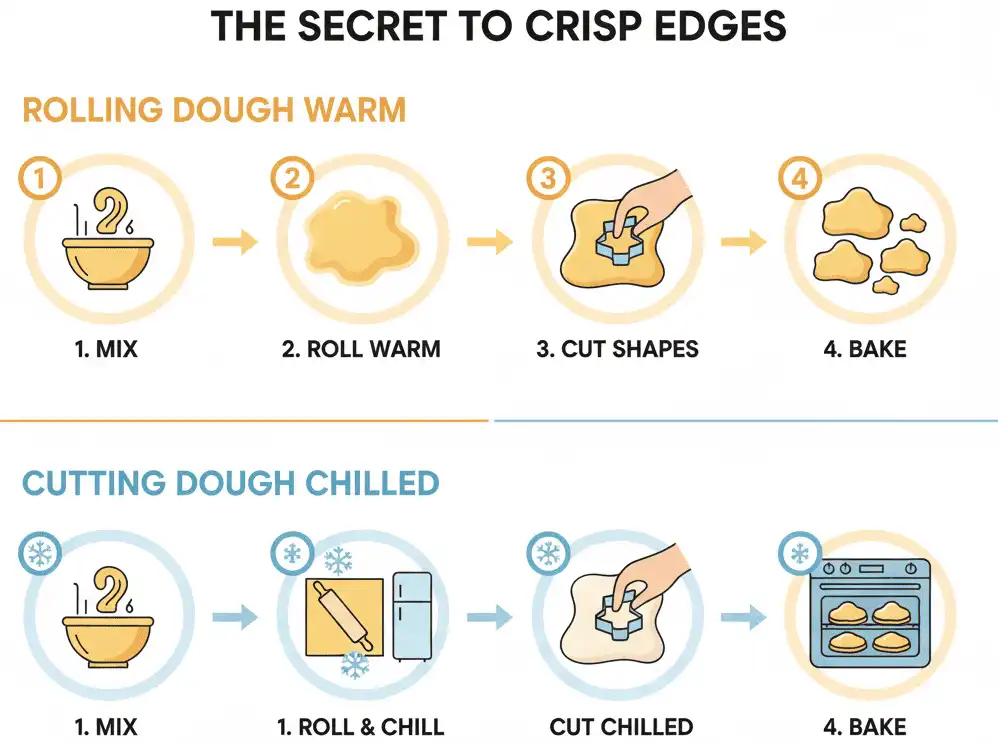
Warm dough guarantees spread. Roll your dough out between two sheets of parchment paper immediately after mixing, rather than chilling a heavy disc first.
Stack the rolled sheets on a baking tray and freeze them for 15 minutes or chill for one hour until firm. Cutting shapes from cold, rolled sheets prevents hand warmth from softening the butter and eliminates dough distortion during cutter release.
Three Essential Halloween Cookie Dough Formulations
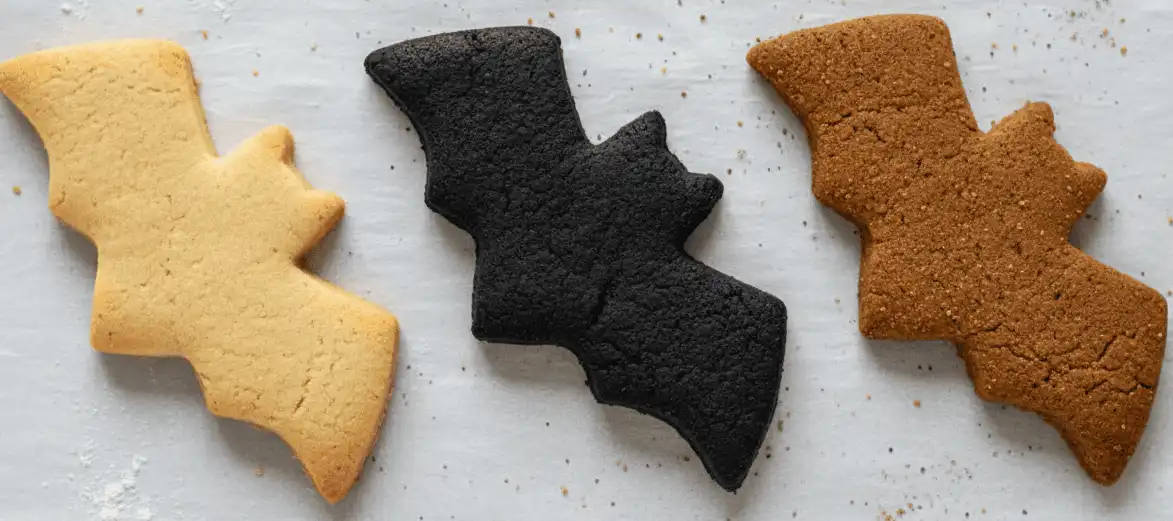
Different cookie designs call for different flavor profiles and structural strengths. These three reliable bases provide maximum stability for royal icing and festive toppings.
1. Classic Vanilla Bean No-Spread Sugar Cookie
This base is the gold standard for intricate royal icing decorating. It offers a smooth, flat surface with zero doming and a balanced vanilla-butter flavor profile.
- Flavor notes: Sweet butter, pure vanilla bean paste, and a hint of almond extract for depth.
- Structure: Dense yet tender crumb that withstands handling and wet icing weight.
- Best used for: Detailed royal icing piping, edible marker drawings, and hand-painted watercolor designs.
2. Jet-Black Cocoa Cookie Base
Black cocoa powder is ultra-Dutched cocoa that provides an intense charcoal color and a distinct, bitter-sweet flavor reminiscent of classic sandwich cookies. It completely eliminates the need for large amounts of black artificial food coloring in your dough.
Balance black cocoa with standard Dutch-processed cocoa to maintain moisture. The dark background makes vibrant orange, neon green, and stark white icings stand out dramatically.
3. Spiced Molasses and Autumn Ginger Cut-Outs
Dark molasses, cinnamon, clove, ginger, and nutmeg create a warm seasonal experience that fills your kitchen with autumn aromas. Molasses adds natural acidity and richness.
This dough holds its shape exceptionally well during baking, making it the premier choice for skeleton cut-outs and structured 3D Halloween cookie assemblies like haunted houses.
Royal Icing Mechanics: Consistencies and Coloring
Royal icing is a mixture of powdered sugar, water, and meringue powder. Meringue powder provides consistent pasteurization, structural elasticity, and reliable setting without the safety risks of raw egg whites.
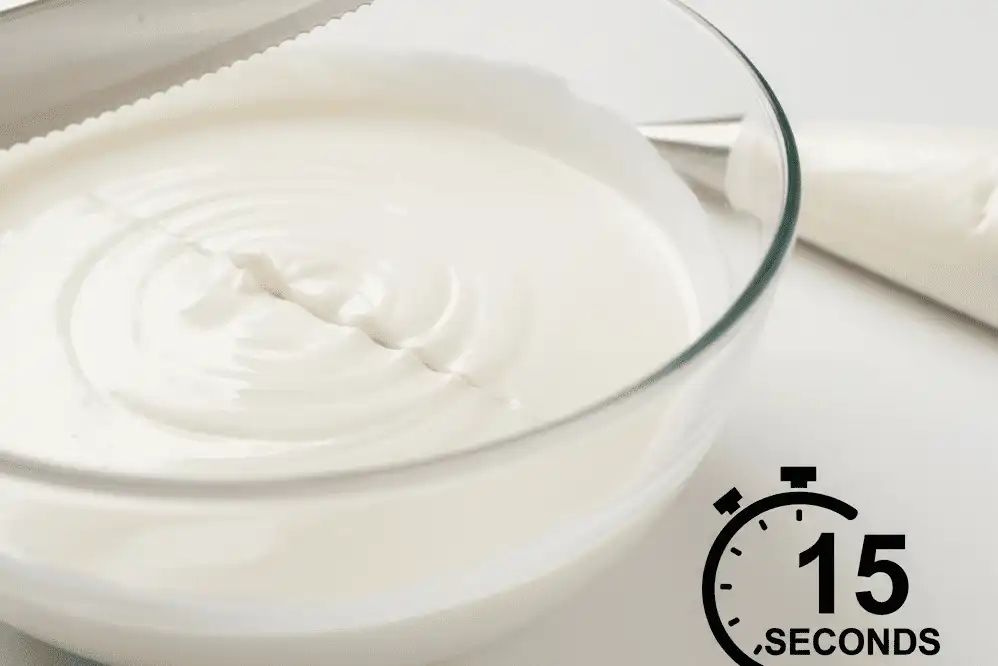
Mastering royal icing comes down to understanding viscosity. Professional decorators do not guess; they time how quickly the icing surface smooths over after being sliced with a knife.
The Three Core Consistencies
Each decorating step requires a specific icing thickness to perform its function properly.
- Stiff Consistency (Toothpaste): Holds rigid peaks when you pull a spatula upward. Use this for piping 3D bones, flower petals, textured pumpkin stems, and dimensional accents.
- Piping/Outline Consistency (Soft Honey): Slowly rounds out over 25 to 30 seconds without disappearing entirely. Ideal for sharp borders, damming flood areas, spiderweb strands, and lettering.
- Flood Consistency (15-to-20-Second Flow): Leveling occurs fully between 15 and 20 seconds after disturbance. Fills outlines smoothly into a flat, glossy sheet without leaking off cookie perimeters.
Eliminating Color Bleed on Spooky Palettes
Halloween color schemes rely on high-contrast pairings, such as pitch black next to bright white or deep violet against vibrant orange. Moisture migration between wet icings causes dyes to bleed across boundaries, creating muddy lines.
Use highly concentrated gel paste colors or powdered food dyes instead of grocery-store liquid drops. Liquid colorants water down your icing ratio and introduce unstable moisture that drives color bleeding.
Let high-intensity colors sit covered for at least two hours before use. Deep shades like black, blood red, and midnight purple darken significantly as the pigments hydrate, allowing you to use less total dye.
Step-by-Step Decorating Tutorials for Spooky Designs
These four foundational designs teach techniques that you can adapt to any Halloween shape or party theme.
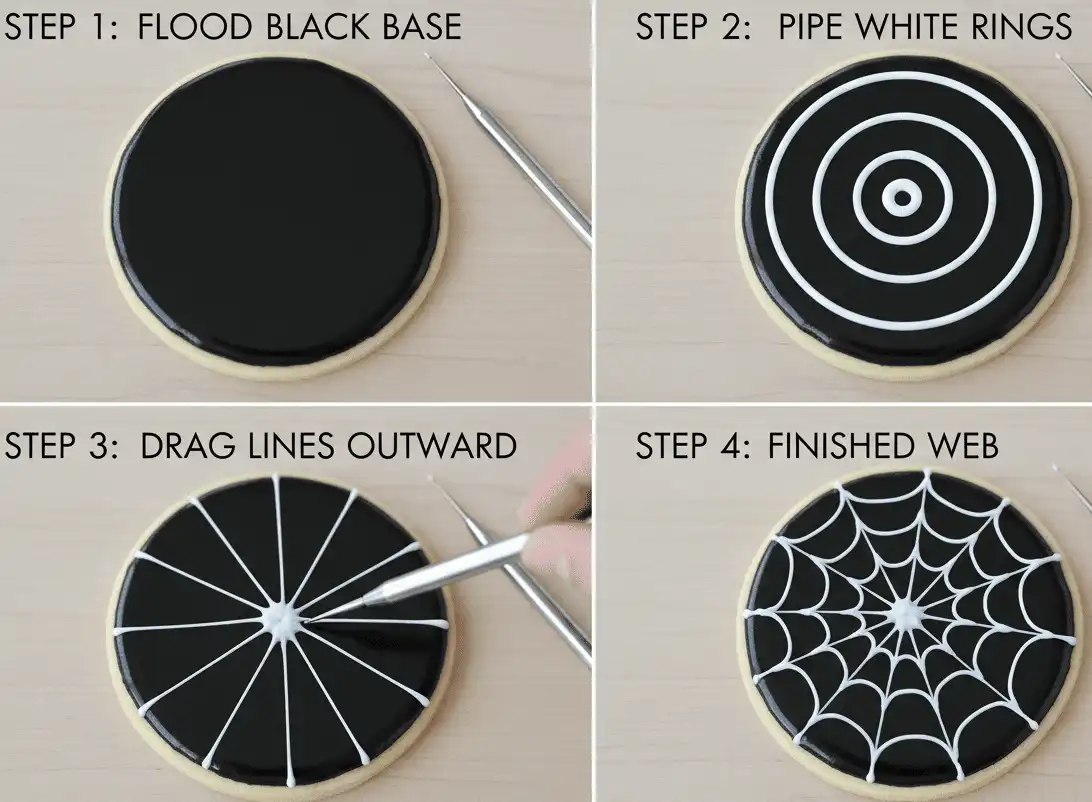
Tutorial 1: The Wet-on-Wet Spiderweb Sugar Cookie
The wet-on-wet technique involves piping wet accent icing directly into a freshly flooded background. The colors settle together into a single, smooth, flat layer.
- What: Create a concentric spiderweb pattern on a circular or scalloped cookie base.
- Why: It produces an intricate, professional design in under two minutes per cookie without intermediate drying steps.
- How: Flood the cookie completely with 15-second black or purple royal icing. Immediately pipe three concentric rings of white flood icing using a tipless piping bag cut with a tiny opening. Drag a scribe tool or clean toothpick from the center point outward to the edge in six evenly spaced radial lines. Wipe the tool clean after every stroke.
- Common mistakes: Waiting too long to pipe the white rings allows the base flood to develop a thin crust, causing the scribe tool to tear the surface.
- Pro tip: Drag lines inward from the edge to the center between your outward strokes to create a complex, realistic web pattern.
Tutorial 2: The Texturized Mummy Cookie
This design utilizes dimensional layering to create realistic, overlapping cloth wraps across a cookie figure.
- What: Turn gingerbread men or oval cookies into wrapped mummies with glowing eyes.
- Why: The layered bands hide imperfect piping and introduce tactile visual depth.
- How: Flood the eye region of the cookie with dark charcoal or black icing and drop two yellow candy pearls or piped red dots into the wet base to serve as glowing eyes. Allow this layer to crust for 20 minutes. Fit a piping bag with a small flat ribbon tip (such as a Wilton #44) filled with medium-stiff off-white icing. Pipe overlapping, crisscrossing bands across the cookie, leaving only the eyes visible.
- Common mistakes: Piping the bandages with runny flood icing causes them to merge into an indistinct white puddle.
- Pro tip: Add a drop of warm ivory gel to pure white icing to give the mummy wraps an aged, dusty tomb aesthetic.
Tutorial 3: The Segmented Dimensional Pumpkin
Real pumpkins have distinct grooves and lobes. You can replicate this shape by piping non-adjacent sections in stages.
- What: Build a 3D pumpkin with pronounced, bulging vertical ridges.
- Why: Flooding an entire pumpkin cut-out at once results in a flat, artificial look.
- How: Outline and flood only the two outer curved sections using 20-second orange icing. Place the cookie in front of a fan for 15 minutes to establish a stable outer crust. Flood the center vertical section between the two dried lobes; the surface tension prevents the sections from merging, creating an organic seam. Finish by piping a stiff brown or green stem at the top.
- Common mistakes: Flooding adjacent sections too soon causes them to sink together into a flat shape.
- Pro tip: Dust the dried seams with dark brown powdered edible petal dust using a soft dry brush to add shadow depth.
Tutorial 4: The Speckled Vampire Splatter Cookie
This artistic approach creates a dramatic presentation with minimal precision piping required.
- What: A stark white or ivory royal icing canvas marked with deep crimson paint splatters.
- Why: High-impact aesthetic that works quickly across dozens of cookies for large events.
- How: Flood cookies with stark white royal icing and let them dry completely for 8 hours until rock hard. Mix one teaspoon of high-proof clear food-grade alcohol (or pure lemon extract) with deep red and burgundy gel color in a small dish. Dip a clean, stiff food-safe bristle brush into the color mixture. Hold the brush over the cookies and drag your gloved finger across the bristles to flick droplets across the surface.
- Common mistakes: Using water to thin the food coloring leaves the dried icing sticky and dissolves holes in the royal icing base. Alcohol evaporates rapidly without damaging sugar structure.
- Pro tip: Place your cookies inside a deep cardboard box before splattering to contain stray droplets.

Kid-Friendly and No-Fuss Decorating Alternatives
Not every Halloween baking project requires multi-step royal icing drying routines. When working with children or preparing treats on a tight timeline, speed and ease take priority.
American Buttercream Piping
American buttercream sets quickly, tastes rich, and is easy for small hands to handle. Tint portions bright orange, monster green, and purple.
Fit piping bags with star tips (like a Wilton 1M) or multi-opening grass tips (Wilton #233). Children can pipe colorful monster fur over round cookies and press assorted candy eyes into the frosting to create silly monsters in seconds.
Chocolate Dipping and Candy Embellishments
Melted dark, milk, and white confectionery coatings provide instant decoration without precision bag control.
Dip half of a baked ghost cut-out into white chocolate, or coat rectangular cookies in green chocolate to craft Frankenstein faces. Add chocolate jimmies for hair and pretzel sticks for neck bolts before the chocolate sets.
Edible Food Pens on Pre-Flooded Cookies
Bake and flood plain white cookies the night before so the royal icing cures into a porcelain-hard surface. Set out fine-tip edible ink pens for kids to draw their own jack-o’-lantern expressions, spiderwebs, and spooky sketches directly onto the cookies without any frosting mess.

Halloween Cookie Base Comparison Table
Review this breakdown to pick the ideal cookie base for your design goals, timeline, and audience.
| Cookie Dough Base | Ideal Decorating Medium | Chill Time | Spreading Risk | Texture Profile | Shelf Life (Room Temp) |
|---|---|---|---|---|---|
| Classic Vanilla Cut-Out | Royal Icing, Glaze, Edible Ink | 45–60 mins | Very Low | Crisp edges, soft bite | 2 to 3 weeks |
| Dark Black Cocoa | Royal Icing (High-contrast white/neon) | 60 mins | Extremely Low | Rich, dark wafer crunch | 2 to 3 weeks |
| Autumn Spiced Molasses | Stiff Royal Icing (Skeleton bones) | 90 mins | Low | Firm snap, chewy interior | 3 to 4 weeks |
| Soft Drop Sugar Cookie | American Buttercream, Sprinkles | 0–15 mins | High (Intentional) | Soft, cake-like center | 4 to 5 days |
| Shortbread Cut-Out | Chocolate Dip, Simple Sugar Glaze | 60 mins | Moderate | Buttery, crumbly, delicate | 3 weeks |
Expert Troubleshooting: Avoiding Common Mistakes
Baking precision eliminates frustrating aesthetic failures. These solutions address the most common issues encountered when preparing Halloween decorated cookies.
1. Icing Cratering in Small Areas
Cratering occurs when small flooded sections (like tiny eyes, mouth cut-outs, or narrow spider legs) cave inward as they dry. This hollow pocket forms when the surface skin dries faster than the moist core beneath it, pulling the center downward.
The Fix: Use slightly thicker flood icing (around 20 to 22 seconds) for tight areas. Before flooding, pipe a small dot or squiggly line of stiff icing in the gap to act as a structural anchor, then flood right over it. Run a small tabletop fan immediately after piping to set the entire volume evenly.
2. Butter Bleed (Yellowing Spots)
Butter bleed occurs when oils from the baked cookie leach upward into dried royal icing, leaving yellow, greasy spots across pristine white ghosts or pastel pumpkins. It frequently happens in warm, humid kitchens.
The Fix: Bake your cookies thoroughly to ensure all structural fats are fully set. Let your baked cookies rest overnight on unbleached parchment paper or butcher paper to draw out excess surface oil before applying icing.
3. Rough Edges on Cut Shapes
Dull cutters or warm dough can drag across the counter, leaving jagged, frayed edges on your baked cookies.
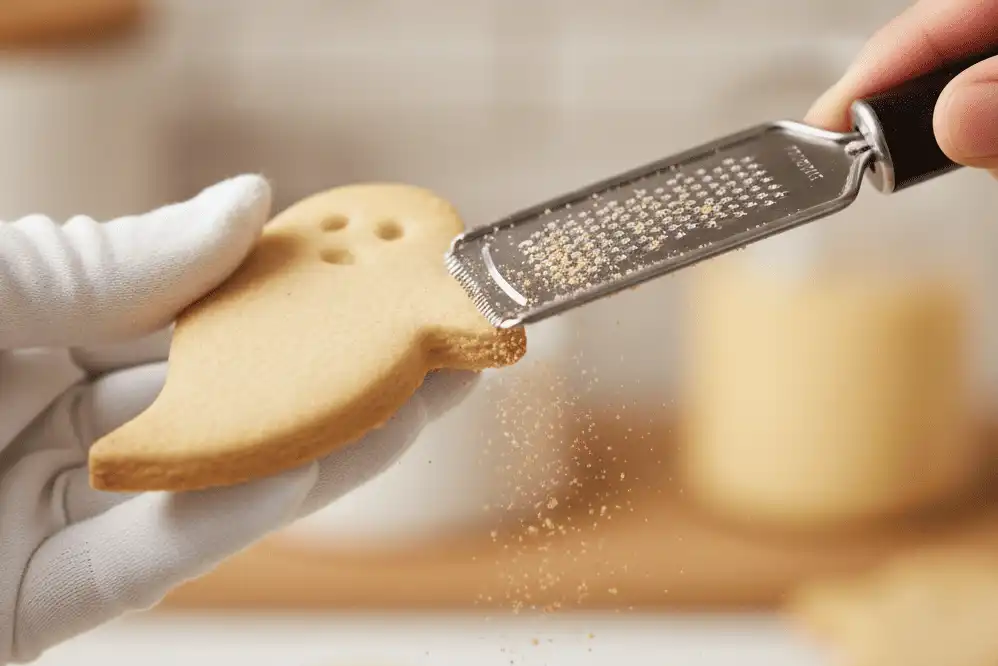
The Fix: Dip metal cookie cutters into a small dish of flour before pressing into the dough. Once the cookies are baked and completely cool, lightly file any rough spots with a fine-mesh kitchen zester or microplane before icing.
Storage, Freezing, and Packaging for Parties
Proper storage prevents your cookies from softening or picking up stale cabinet odors. Royal icing requires ample curing time before it can handle stacking or packaging.
Curing and Drying Times
Royal icing dries from the outside in. While a cookie may feel dry to a light touch after two hours, the core remains soft and pliable for up to twelve hours.
Let decorated cookies rest uncovered on baking sheets in a cool, low-humidity room for a full 8 to 12 hours before bagging or stacking them. Setting up an oscillating room fan on its lowest speed accelerates drying without cracking the delicate sugar shells.
Packaging for Gifts and Events
Individual presentation keeps cookies hygienic and intact for trick-or-treaters or party guests.
- Heat-sealed food-grade cellophane bags: The gold standard for shelf stability. Cookies packed this way remain fresh for up to three weeks at room temperature.
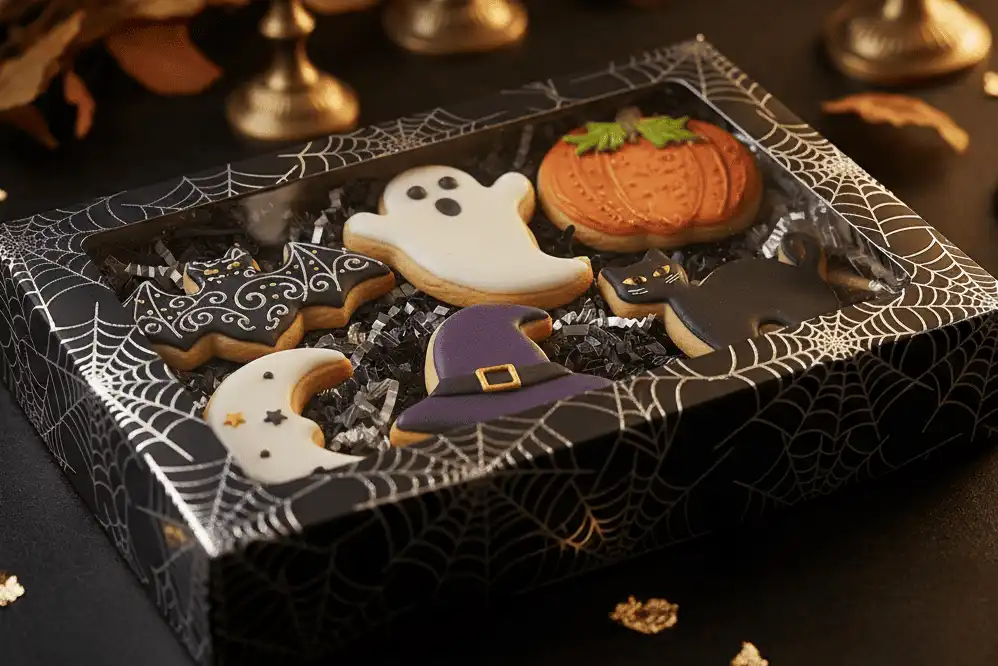
- Bakery boxes with greaseproof food liners: Best for party platters. Place parchment paper between single layers to keep protruding design elements safe from chipping.
The Freezing and Thawing Protocol
You can freeze decorated cookies for up to three months without damaging your designs if you follow the correct thawing process.
Pack fully cured cookies on their edges in airtight plastic containers lined with bubble wrap or crumpled parchment. When you are ready to serve, remove the container from the freezer and leave it sealed on the counter for at least two hours.
Crucial Rule: Never open the container while the cookies are still cold. Condensation will form directly on the iced cookies instead of the outer plastic, dissolving your royal icing and causing dark colors to bleed instantly.
Essential Baker’s Toolkit
Having the right tools ready streamlines your workflow and ensures consistent results throughout your Halloween bake.
- Metal Cookie Cutters: High-grade stainless steel cutters yield sharper edges than flexible plastic options.
- Tipless Piping Bags: Lightweight disposable bags that you can cut to your exact needed aperture, eliminating the hassle of cleaning plastic couplers.
- Cookie Scribe Tool: A fine-tipped metal needle used to pop air bubbles, pull wet-on-wet designs, and guide flood icing into tight corners.
- Perforated Silicone Baking Mats: Mats with micro-perforations let steam escape downward, eliminating bubbles under your cookies and creating flat, level backs.
- Tabletop Fan or Food Dehydrator: A low-heat dehydrator set to 95°F (35°C) or a simple desk fan sets the shine on royal icing and stops color bleeding.
Suggested Related Reading
Expand your seasonal baking menu with these detailed companion tutorials across our site:
- The Complete Guide to Meringue Powder Royal Icing: Ratios and Consistency Charts
- No-Spread Vanilla Bean Sugar Cookies: Complete Recipe and Baking Tips
- Baking with Black Cocoa Powder: How to Get Natural Jet-Black Treats
- Creative Halloween Dessert Buffets: Party Planning and Portion Guides
- How to Heat-Seal and Package Artisan Cookies for Seasonal Gifting
- Hand-Painting on Royal Icing: Using Edible Luster Dusts and Food Gels
External Authority Resources
For verified culinary standards, ingredient safety guidelines, and classic food science principles, consult these respected baking resources:
- King Arthur Baking Company: Professional cookie science, flour protein explanations, and moisture balance guides.
- U.S. Food and Drug Administration (FDA): Safety regulations regarding certified food colorings, dyes, and edible luster dust safety standards.
- Sugar Association Culinary Library: The structural role of granulated sucrose and powdered sugar in crust setting and confectionery shelf life.
Key Takeaways
- Keep mixing gentle: Cream butter and sugar minimally to avoid introducing air that causes cut-out cookies to lose their shape in the oven.
- Roll first, then chill: Rolling warm dough between parchment sheets before chilling yields clean, sharp edges without sticking.
- Choose your icing by the clock: Outline with 25-second icing and flood with 15-to-20-second icing to keep surfaces flat, smooth, and contained.
- Speed up surface drying: Moving air from a fan or low-temp dehydrator prevents color bleeding and eliminates center cratering.
- Thaw in sealed containers: Always let frozen decorated cookies reach room temperature inside their sealed storage boxes to protect the royal icing from condensation.
Wrap-Up: Bringing Your Spooky Cookie Designs to Life
Baking memorable Halloween cookies comes down to smart timing, temperature control, and proper icing consistency. Once you have a reliable no-spread base, you can let your imagination run wild across ghosts, spiderwebs, and custom monsters.
Start by testing your icing consistencies on a few test cookies to calibrate your piping hands. Gather your cutters, prep your bags, and enjoy creating the centerpiece treats for your Halloween celebration.
Frequently Asked Questions
Why do my Halloween cookies spread and lose their shape in the oven?
Cookies spread when the butter gets too warm, the dough contains excess leavening like baking powder, or the butter and sugar were over-creamed. Over-mixing traps air pockets that expand and collapse in the oven. Keep leavening to a minimum and chill your cut shapes thoroughly before baking.
How far in advance can I make Halloween cookies?
You can bake undecorated cut-out cookies up to one month ahead and store them in the freezer. Decorated royal icing cookies keep fresh for up to three weeks at room temperature when sealed in airtight cellophane bags. Plan to decorate two to three days before your event for the best flavor and texture.
How do I make deep black royal icing that doesn’t taste bitter?
Start with a dark chocolate base by whisking Dutch-processed or black cocoa powder into your powdered sugar before adding liquid. This dark base minimizes the amount of black gel food color needed. Let your black icing rest for several hours before use, as the color deepens significantly as the pigment hydrates.
Can I use milk instead of water to thin royal icing?
Never use milk to thin royal icing meant for long-term room-temperature storage. Milk adds fat, which ruins the icing’s structural setting ability and introduces dairy that can spoil when left out. Stick to clean room-temperature water or pasteurized lemon juice to adjust your icing’s hydration safely.
What causes royal icing to crater or sink in small sections?
Cratering happens when small flooded zones dry too slowly underneath while a thin top crust forms first, causing the center to cave inward. Prevent this by using slightly thicker 20-second flood icing for small spaces, piping a structural support dot inside first, and drying your cookies in front of a fan.
How do I dry royal icing quickly so colors don’t bleed?
Set your freshly decorated cookies in front of a tabletop fan running on low speed, or arrange them in a food dehydrator set to 95°F (35°C). Moving air forms a fast surface crust on the icing, which locks pigments in place and creates a glossy, professional finish.
Can I freeze cookies that are already decorated with royal icing?
Yes, fully cured royal icing cookies freeze well for up to three months. Pack them carefully in airtight containers with parchment paper between layers. Thaw the container at room temperature for at least two hours before opening it to keep ambient condensation from ruining the icing.
What is the difference between royal icing and confectionery glaze?
Royal icing uses meringue powder to set into a firm, matte-to-satin finish that allows for intricate 3D details and smooth flooding. Glaze uses powdered sugar, milk or corn syrup, and water. Glaze remains softer and yields a translucent sheen, but it does not support precise piping lines.